Astronomy
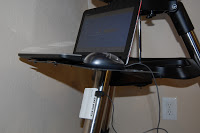
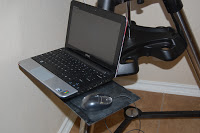
Once I started using a laptop (specifically a Dell Inspiron Mini Netbook), I realized that I would need some form of stand for it near the scope. I had been using a large camping table, but with slew changes I found I had to keep moving the table to keep cords in alignment to avoid them being pulled out. A few nights of this was enough for me to come up with a new solution: building a platform on the tripod leg for my laptop.


- Adventures With Binoculars: Using A Tripod
After initially getting my binoculars, I was very excited to be able to get out quickly and start observing. However, after a few short observing sessions, holding the binoculars in my unstable hands, I started to notice that my views were getting shaky....
- My First Polar Alignment Attempt
So my first attempt at polar alignment and working with the wedge were about what I expected, meaning not that great but at least I learned alot. Though at least with the clouds and the moon I didnt feel like I was wasting a great observing night. Here's...
- A Balancing Act
I knew it would be inevitable - I would have to get a counterweight system at some point to balance the CPC. Yes, it is perfectly balanced when you get it from the factory, assuming you keep with the 1.25" eyepieces (EPs) and you add nothing else onto...
- Top 10 Brightest Stars As Seen From Earth
Brightest stars Top 10 Brightest stars as seen from earth ...
- Sky Watching December 9-11
Sky Watching 2012,December 9-11 Sun., December 9, 3 a.m Vesta at opposition : ...
Astronomy
Building a laptop shelf on the CPC tripod
Once I started using a laptop (specifically a Dell Inspiron Mini Netbook), I realized that I would need some form of stand for it near the scope. I had been using a large camping table, but with slew changes I found I had to keep moving the table to keep cords in alignment to avoid them being pulled out. A few nights of this was enough for me to come up with a new solution: building a platform on the tripod leg for my laptop.
What I used:
-1 x 12" x 7" piece of aluminum flashing (to extend for mouse area)
-1 x 5.5" x 7" piece of aluminum w/holes (used to hold boards)
-1 x large stiff door hinge
-1 x LS30 45º angle "Strong-Tie"
-1 x U-shaped metal fence post bracket (size to go around a tripod leg)
-1 x 2" bungee cord (used for extra stability)
-Velcro strips
-6 x nuts/bolts thin enough to go through holes of holed-aluminum
-(optional): Black Spray paint, sandpaper, Dremel cutter to trim off ends of bolts
How its done:
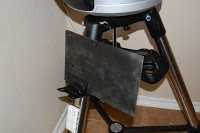
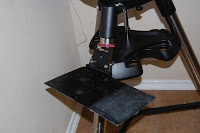
1) Place the U-shaped post bracket around the tripod leg, Put ends through both the Strong-Tie and the door hinge (with Strong-Tie underneath the door hinge). Attach the nuts that come with the bracket and tighten.
2) If you are using the extra aluminum flashing (as I did) for a mouse area, place this underneath the holed-aluminum. Make sure both are on top of both the Strong-Tie and Door hinge as those are what hold up this part. Bolt through both pieces of aluminum and onto the door hinge (DO NOT bolt onto the Strong Tie if you want to be able to raise the stand as I show in one of the pic)
3) After these are fastened securely hand move the Strong Tie to an angle that will allow the laptop to sit level (mine is not quite 90º) and support the above aluminum table.
4) Use the bungee cord to loop around the top of the tripod leg and into the top holes of the door hinge for added stability (additional option is getting a smaller post bracket for these holes)
5) I then spray-painted everything black (though I would suggest to do this before you start, used a Dremel cutter to cut all the bolts flush to their nuts and then sanded the mouse portion (as I have a laser mouse the flat black was absorbing too much light and the mouse wasnt working. I also have Velcro squares on the bottom on the laptop and top of the holed aluminum for a little more stability for the laptop and I used Velcro to mount my USB hub below the new stand onto the leg.
- Adventures With Binoculars: Using A Tripod
After initially getting my binoculars, I was very excited to be able to get out quickly and start observing. However, after a few short observing sessions, holding the binoculars in my unstable hands, I started to notice that my views were getting shaky....
- My First Polar Alignment Attempt
So my first attempt at polar alignment and working with the wedge were about what I expected, meaning not that great but at least I learned alot. Though at least with the clouds and the moon I didnt feel like I was wasting a great observing night. Here's...
- A Balancing Act
I knew it would be inevitable - I would have to get a counterweight system at some point to balance the CPC. Yes, it is perfectly balanced when you get it from the factory, assuming you keep with the 1.25" eyepieces (EPs) and you add nothing else onto...
- Top 10 Brightest Stars As Seen From Earth
Brightest stars Top 10 Brightest stars as seen from earth ...
- Sky Watching December 9-11
Sky Watching 2012,December 9-11 Sun., December 9, 3 a.m Vesta at opposition : ...
