Astronomy
I have been wanting to get active dew control for a while, especially after multiple nights with a dripping scope and having to use my blow dryer to clear the corrector plate so I could continue imaging. I saw on the Cloudy Nights Forum a while back that someone had put their dew controller into their fork arm and thought this was a great idea, it would cut down on wires and things velcro-ed to the scope in the field. I finally got in my Dew-Not dew controller and after ensuring it worked I decided to go about performing the modification.
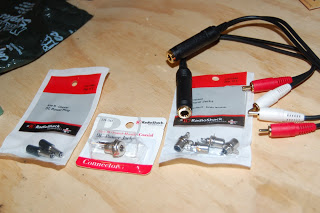
First, a trip to Radio Shack! Here are the parts I had to get:
-Size M coaxial DC power plug (part #274-1569)
-Size M coaxial DC panel mount power jack (part #274-1563)
-4 RCA jacks
-4 Shielded phono jacks (panel mount) (part #274-0346)
You will also need a Dew-Not dew controller, a solder gun and solder as well as a set of alan wrenches and a small flat-head & phillips screw driver. A Dremel sanding tool (or sand paper), and a Drill. Small wooden or plastic dowels are helpful to keep the circuit panel in place but not a necessity.
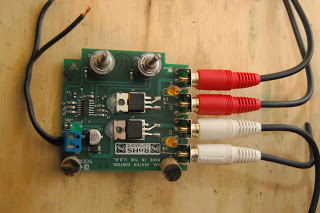
Now its time to solder! Put the circuit board in place and affix the temp. knobs so it will hold in place and then solder on your RCA wires and your power wires.
Before you attach it back to the scope, test it out. I used my Starizona power pack to make sure it worked as I havent attached the Size M coaxial power plug to the wire yet. Once you are sure all the connections work, attach your fork-arm cover back to the scope and you are done!!!
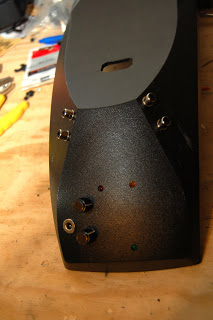
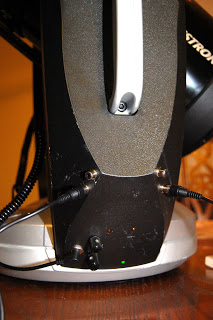
For the power plug, just solder on the wires onto the Size M coaxial power plug and you are done. I found the included power wire was a bit short so I am going to run back to RS and get a longer wire for the power to avoid cord wrap, but other than that, my Dew-Heater Fork-Arm mod is complete!!! Hey, if I can do it all by myself without ever having soldered anything before, anyone can!!!
- Mars Exploration Rover Mission In Possible Danger
A huge dust storm on Mars, covering the southern hemisphere of Mars almost completely, has put the future of the Mars Exploration Rovers Mission in danger. A smaller dust storm has also appeared elsewhere on Mars, adding further danger. The largest dust...
- Astronomy Laser Pointers - Cutting Edge Lasers Improve Astronomy Pointers Science
By Jim Bradley The scientific community which has benefited the greatest from improvements in laser light and laser pointer technology is the field of astronomy. It seems there are no more perfect applications for high power laser pointers than to be...
- A Balancing Act
I knew it would be inevitable - I would have to get a counterweight system at some point to balance the CPC. Yes, it is perfectly balanced when you get it from the factory, assuming you keep with the 1.25" eyepieces (EPs) and you add nothing else onto...
- Building A Laptop Shelf On The Cpc Tripod
Once I started using a laptop (specifically a Dell Inspiron Mini Netbook), I realized that I would need some form of stand for it near the scope. I had been using a large camping table, but with slew changes I found I had to keep moving the table to keep...
- Getting Connected-- Engaging Your Institution And Community
Post by guest-blogger Meredith Danowski*, PhD student in Astronomy at Boston University. You've got a group of people together, committed to a cause. You have ideas and goals, you want to blaze a trail, you want to solve problems. Anyone can plan...
Astronomy
Dew Heater Controller in Fork-Arm Modification for CPC
I have been wanting to get active dew control for a while, especially after multiple nights with a dripping scope and having to use my blow dryer to clear the corrector plate so I could continue imaging. I saw on the Cloudy Nights Forum a while back that someone had put their dew controller into their fork arm and thought this was a great idea, it would cut down on wires and things velcro-ed to the scope in the field. I finally got in my Dew-Not dew controller and after ensuring it worked I decided to go about performing the modification.
First, a trip to Radio Shack! Here are the parts I had to get:
-Size M coaxial DC power plug (part #274-1569)
-Size M coaxial DC panel mount power jack (part #274-1563)
-4 RCA jacks
-4 Shielded phono jacks (panel mount) (part #274-0346)
You will also need a Dew-Not dew controller, a solder gun and solder as well as a set of alan wrenches and a small flat-head & phillips screw driver. A Dremel sanding tool (or sand paper), and a Drill. Small wooden or plastic dowels are helpful to keep the circuit panel in place but not a necessity.
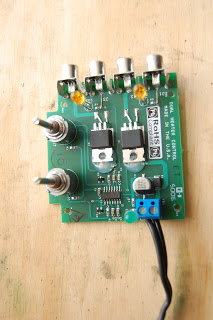
Next you need to disassemble your Dew-Not controller and take out the circuit board, use your small flat-head screwdriver to take off the adjustor knobs - keep them handy for later :
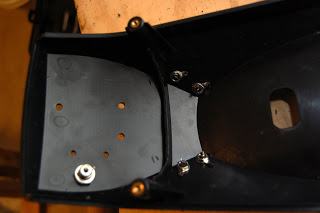
Now take off the panel for your fork arm with the handle with the Alan-wrench set. There are two screws on the handle and four on the inside corners of the fork-arm. The cover will come off easily.
Next you will need to drill the appropriate holes in the fork arm cover. Use the circuit board to determine exactly where. You will need 2 for the temperature knobs and 3 for the lights. Don't make them too big else it will allow movement in the board which could pull wires loose. After you have the circuit board able to fit in the cover you can determine where to drill the holes for the power plug and the RCA jacks. I found with the circuit board, space was tight so the RCA jacks are on the sides rather than the front face, and my power jack is to the right of the temperature knobs. Once you decide where, drill those holes and attach the appropriate jacks.
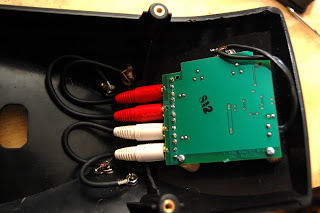
Next I decided to cut the wooden dowels to help keep the circuit board stable on the left side (looking from the inside) ... the right side will be held by the temp. knobs. I put the circuit board in and decided how long to cut them then used the small silver circuit board screws that were used in the Dew-Not box to put the dowels on the board. At the same time I used the Dremel sanding tool to sand the ridge down on the cover so that the RCA jacks wouldnt raise up the circuit board.
(the wooden dowels are on the bottom edge)
Now its time to solder! Put the circuit board in place and affix the temp. knobs so it will hold in place and then solder on your RCA wires and your power wires.
Before you attach it back to the scope, test it out. I used my Starizona power pack to make sure it worked as I havent attached the Size M coaxial power plug to the wire yet. Once you are sure all the connections work, attach your fork-arm cover back to the scope and you are done!!!
- Mars Exploration Rover Mission In Possible Danger
A huge dust storm on Mars, covering the southern hemisphere of Mars almost completely, has put the future of the Mars Exploration Rovers Mission in danger. A smaller dust storm has also appeared elsewhere on Mars, adding further danger. The largest dust...
- Astronomy Laser Pointers - Cutting Edge Lasers Improve Astronomy Pointers Science
By Jim Bradley The scientific community which has benefited the greatest from improvements in laser light and laser pointer technology is the field of astronomy. It seems there are no more perfect applications for high power laser pointers than to be...
- A Balancing Act
I knew it would be inevitable - I would have to get a counterweight system at some point to balance the CPC. Yes, it is perfectly balanced when you get it from the factory, assuming you keep with the 1.25" eyepieces (EPs) and you add nothing else onto...
- Building A Laptop Shelf On The Cpc Tripod
Once I started using a laptop (specifically a Dell Inspiron Mini Netbook), I realized that I would need some form of stand for it near the scope. I had been using a large camping table, but with slew changes I found I had to keep moving the table to keep...
- Getting Connected-- Engaging Your Institution And Community
Post by guest-blogger Meredith Danowski*, PhD student in Astronomy at Boston University. You've got a group of people together, committed to a cause. You have ideas and goals, you want to blaze a trail, you want to solve problems. Anyone can plan...
